Make your own Read Article Later menu bar
Add a hotkey that lets you save interesting articles to read later, with Dropbox sync between computers.
Next Chapter| APIs used today | Description |
| hs.alert | Draws an alert message on the screen. |
| hs.application | Query and interact with running applications. |
| hs.fnutils | A collection of functional programming utility functions. |
| hs.json | Functions for decoding and encoding JSON. |
| hs.menubar | Create and manage system menubar icons, as well as interactive submenus. |
| hs.osascript | Execute any AppleScript with this library. |
| hs.pathwatcher | Watches a file or directory. When anything changes, it calls a callback function you supply. |
| hs.task | An async (non-blocking) library for running shell commands. |
What you’re building #
In this chapter, you’re going to create a hotkey that saves the URL and title of your current Chrome tab to a list to read later. You’re also going to build a system menubar that shows all the articles you’ve saved, along with some basic controls to open and delete articles, as well as pick an article at random to read. Finally, you’ll save your read article queue to a file on your hard drive, and optionally choose to sync it to Dropbox so you can share your articles across multiple computers. Fancy!
Create your project files #
Create a directory to hold your new files in, and create an init.lua file inside it:

mkdir -p ~/.hammerspoon/read-later
touch ~/.hammerspoon/read-later/init.lua
Next, require the new folder in your main config:
require("read-later")Add a new system menu bar #
The first thing you’re going to do is render a menu in the system menu bar, located in the upper right of your screen. You’ll use the hs.menubar API to accomplish this in a few lines of code.
Download the icon for the menu bar #
Your menu bar will need an icon, so I’ve provided a little book icon courtesy of Font Awesome: 
Download the icon to your project directory by pasting this into the terminal:
curl -o ~/.hammerspoon/read-later/book2.png \
  https://learnhammerspoon.com/assets/images/chapters/15/book.png
Render the menu #
To show a menu icon in the menu bar, you just need to create a new hs.menubar and give it an icon with the setIcon() method. Add this code to the top of your config file:
ReadLater = {}

ReadLater.menu = hs.menubar.new()
ReadLater.menu:setIcon(hs.image.imageFromPath(os.getenv('HOME') .. '/.hammerspoon/read-later/book.png'))
Refresh Hammerspoon. You should now see a new menu bar icon, using the book.png image you downloaded:
Add your first menu items #
The next step is to show a dropdown menu bar when you click the book icon. To give it menu items, you can use the setMenu() method. This method takes a table of menu items as its only argument. Each menu item contains at minimum a title key, so the menu at least knows what to print out as the title.
Add the code in green to your config file:
ReadLater = {}

ReadLater.menu = hs.menubar.new()
ReadLater.menu:setIcon(hs.image.imageFromPath(os.getenv('HOME') .. '/.hammerspoon/read-later/book.png'))

updateMenu = function()
  local items = {
    {
      title = "ReadLater",
      disabled = true
    },
  }

  ReadLater.menu:setMenu(items)
end

updateMenu()
In the coming steps, you’ll make selecting the menu item open the associated article, but for now each menu item won’t actually do anything when selected.
Add a hotkey to save an article #
Next, you need a way to save articles for later, so you can render them in your menubar.
First, add a new ReadLater.articles table to hold your list of articles to read:
ReadLater = {}

ReadLater.articles = {}

ReadLater.menu = hs.menubar.new()
ReadLater.menu:setIcon(hs.image.imageFromPath(os.getenv('HOME') .. '/.hammerspoon/read-later/book.png'))
Next, you’ll create a function to save the current Chrome tab to the articles table. At the end of this snippet, you’ll bind that function to the Super + S hotkey.
Add the code in green to your config file:
ReadLater = {}

ReadLater.menu = hs.menubar.new()
ReadLater.menu:setIcon(hs.image.imageFromPath(os.getenv('HOME') .. '/.hammerspoon/read-later/book.png'))

updateMenu = function()
  local items = {
    {
      title = "ReadLater",
      disabled = true
    },
  }

  ReadLater.menu:setMenu(items)
end

-- Get the URL and <title> of the current Chrome tab, and return it as
--
--   {
--     url = "https://...",
--     title = "An interesting article",
--   }
--
-- Returns `nil` if there are no open Chrome tabs.
local function getCurrentArticle()
  if not hs.application.find('Google Chrome') then
    -- Chrome isn't running right now.
    return nil
  end

  -- Get the URL of the current tab
  local _, url = hs.osascript.applescript(
    [[
      tell application "Google Chrome"
        get URL of active tab of first window
      end tell
    ]]
  )

  -- Get the <title> of the current tab.
  local _, title = hs.osascript.applescript(
    [[
      tell application "Google Chrome"
        get title of active tab of first window
      end tell
    ]]
  )

  -- Remove trailing garbage from window title
  title = string.gsub(title, "- - Google Chrome.*", "")

  return {
    url = url,
    title = title,
  }
end

saveCurrentTabArticle = function()
  article = getCurrentArticle()

  if not article then
    return
  end

  -- Save the article
  table.insert(ReadLater.articles, article)

  -- Refresh the menubar since we have a new article
  updateMenu()

  hs.alert("Saved " .. article.title)
end

superKey:bind('s'):toFunction('Read later', saveCurrentTabArticle)

----

updateMenu()
Reload Hammerspoon, navigate to any website in Chrome, and press your new Super + S hotkey. You should see a popup that says “Saved
Add each article to the menu bar #
Now that you have a way to save an article to a table, you’re going to use that to render each article in the menu bar. When there’s items in the articles table, you’ll add each one as a selectable menu item. If there’s no more articles to read, you’ll add a disabled menu item with the title "No more articles to read" in gray.
To add your articles, modify the updateMenu() function with the code highlighted in green:
updateMenu = function()
  local items = {
    {
      title = "ReadLater",
      disabled = true
    },
  }

  -- Add a divider line
  table.insert(items, { title = "-" })

  -- Render each article
  if #ReadLater.articles == 0 then
    table.insert(items, {
      title = "No more articles to read",
      disabled = true
    })
  else
    for _, article in ipairs(ReadLater.articles) do
      -- Add each article to the list of menu items
      table.insert(items, {
        title = article.title,
      })
    end
  end

  ReadLater.menu:setTitle("(" .. tostring(#ReadLater.articles) .. ")")
  ReadLater.menu:setMenu(items)
end
Refresh Hammerspoon, open a webpage in Chrome, and save an article with your hotkey. You should see the menu bar update with the number of articles (1), and when you open the menu bar the article should be listed inside. It should look something like this:

Open each article when its menu item is clicked #
hs.menubar lets you attach a function to fire when a menu item is selected by adding a fn key to your menu item. Here’s a small example:
menu = hs.menubar.new()
menu:setTitle("My menu")
menu:setMenu({
  {
    title = "Say hello",
    -- When this item is selected from the dropdown menu, this `fn` will be
    -- called for you.
    fn = function()
      hs.alert.show("Hello from the menu!")
    end,
  }
})
You’re going to extend your menu items in the same way. For now, when a menu item is selected, you’ll open the article.url in a new Chrome tab. Extend your current config with the code snippets in green:
local function openUrl(url)
  local task = hs.task.new(
    "/Applications/Google Chrome.app/Contents/MacOS/Google Chrome",
    nil,
    function() end, -- noop
    {
      url
    }
  )

  task:start()
end

local function readArticle(article)
  openUrl(article.url)
end

updateMenu = function()
  local items = {
    {
      title = "ReadLater",
      disabled = true
    },
  }

  -- Add a divider line
  table.insert(items, { title = "-" })

  -- Render each article
  if #ReadLater.articles == 0 then
    table.insert(items, {
      title = "No more articles to read",
      disabled = true
    })
  else
    for _, article in ipairs(ReadLater.articles) do
      -- Add each article to the list of menu items
      table.insert(items, {
        title = article.title,
        fn = function()
          readArticle(article)
        end,
      })
    end
  end

  ReadLater.menu:setTitle("(" .. tostring(#ReadLater.articles) .. ")")
  ReadLater.menu:setMenu(items)
end
Remove each article when its menu item is clicked #
Let’s extend the fn you just created to remove the article from the articles table when it gets opened for reading. Add a removeArticle(article) function, and update your readArticle() function to call it:
local function removeArticle(article)
  ReadLater.articles = hs.fnutils.filter(ReadLater.articles, function(savedArticle)
    return savedArticle.url ~= article.url
  end)

  updateMenu()
end

local function readArticle(article)
  openUrl(article.url)
  removeArticle(article)
end

updateMenu = function()
  -- ... actual implementation here ...
end- Refresh Hammerspoon
- Save a new article.
- Open the article from the menu bar.
It should now be removed from the menu!
Add a submenu to remove each article #
For the last piece of interactive UI, you’re going to add a submenu under each article that lets you delete the article without reading it. Each menu item that you pass to the setMenu() function in hs.menubar also can have an additional menu key. This menu gets shown as a submenu when you mouse over each article item in the menu bar dropdown.

You already have a removeArticle() defined and ready to use. To add the additional submenu, you just need to add the code in green in the below snippet:
updateMenu = function()
local items = {
{
title = "ReadLater",
disabled = true
},
}
-- Add a divider line
table.insert(items, { title = "-" })
-- Render each article
if #ReadLater.articles == 0 then
table.insert(items, {
title = "No more articles to read",
disabled = true
})
else
for _, article in ipairs(ReadLater.articles) do
-- Add each article to the list of menu items
table.insert(items, {
title = article.title,
fn = function()
readArticle(article)
end,
menu = {
{
title = "Remove article",
fn = function()
removeArticle(article)
end,
},
}
})
end
end
ReadLater.menu:setTitle("(" .. tostring(#ReadLater.articles) .. ")")
ReadLater.menu:setMenu(items)
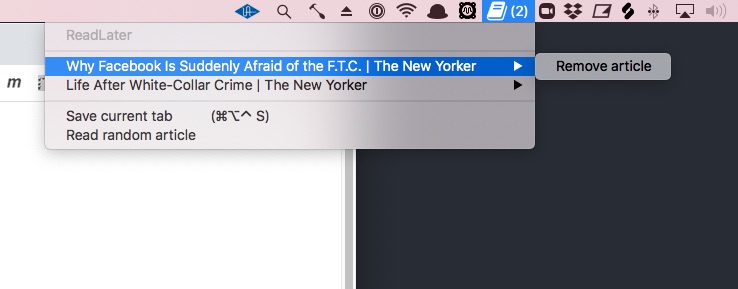
endTest it out:
- Refresh Hammerspoon
- Save a new article.
- Open the menu bar and mouse over the article title.
- You should see a Remove article submenu item.
- Select Remove article.
- Open the menu bar again.
The article should be successfully removed!
Add final menu controls #
As a last step, add a couple last controls to the menu:
- Save current tab - this will call the same function that you bound to Super + S earlier.
- Read random article - this will open a random article from your list of
articles.
Add the readRandomArticle() function and the new menu items highlighted in green:
local function readRandomArticle()
  local index = math.random(1, #ReadLater.articles)
  readArticle(ReadLater.articles[index])
end

updateMenu = function()
  local items = {
    {
      title = "ReadLater",
      disabled = true
    },
  }

  -- Add a divider line
  table.insert(items, { title = "-" })

  -- Render each article
  if #ReadLater.articles == 0 then
    table.insert(items, {
      title = "No more articles to read",
      disabled = true
    })
  else
    for _, article in ipairs(ReadLater.articles) do
      -- Add each article to the list of menu items
      table.insert(items, {
        title = article.title,
        fn = function()
          readArticle(article)
        end,
        menu = {
          {
            title = "Remove article",
            fn = function()
              removeArticle(article)
            end,
          },
        }
      })
    end
  end

  table.insert(items, { title = "-" })
  table.insert(items, {
    title = "Save current tab          (⌘⌥⌃ S)",
    fn = saveCurrentTabArticle,
  })

  table.insert(items, {
    title = "Read random article",
    fn = readRandomArticle,
  })

  ReadLater.menu:setTitle("(" .. tostring(#ReadLater.articles) .. ")")
  ReadLater.menu:setMenu(items)
end
Test it out by refreshing Hammerspoon, and playing with each of the new menu items.
Save the articles to disk #
By now you’ve probably noticed that every time you quit and reopen Hammerspoon, the table of articles resets to being empty. To fix this, you have to make sure that every time you add or remove an article, you save the articles table to disk somewhere.
You can use Hammerspoon’s hs.json functions to convert the table to and from JSON, and Lua’s core io.open function to read/write your articles file.
You’ll write a function to write the articles table to disk, and call it every time you modify your articles table. You’ll also write a function to read the article JSON from disk and parse it once on startup, so that you don’t lose your articles between Hammerspoon restarts.
Add the two sync functions highlighted in green to your config:
ReadLater.menu = hs.menubar.new()
ReadLater.menu:setIcon(hs.image.imageFromPath(os.getenv('HOME') .. '/.hammerspoon/read-later/book.png'))

local saveCurrentTabArticle = nil
local updateMenu = nil

--------- sync functions

-- Where do you want to persist your articles to disk?
--
-- If you use Dropbox and save it to your ~/Dropbox folder, it will work across
-- multiple computers. Otherwise, you can choose a different path.
ReadLater.jsonSyncPath = os.getenv('HOME') .. "/Dropbox/read-later.json"

local function readArticlesFromDisk()
  local file = io.open(ReadLater.jsonSyncPath, 'r')

  if file then
    local contents = file:read("*all")
    file:close()

    ReadLater.articles = hs.json.decode(contents) or {}
    updateMenu()
  end
end

local function writeArticlesToDisk()
  hs.json.write(ReadLater.articles, ReadLater.jsonSyncPath, true, true)
end
Sync to disk when an article is added: #
Next, make sure you sync the articles table to disk every time a new article is added, by making the edits in green:
saveCurrentTabArticle = function()
  article = getCurrentArticle()

  if not article then
    return
  end

  -- Save the article
  table.insert(ReadLater.articles, article)

  -- Refresh the menubar since we have a new article
  updateMenu()

  -- Sync to disk
  writeArticlesToDisk()

  hs.alert("Saved " .. article.title)
end
Sync to disk when an article is removed: #
You also need to make sure you sync the articles table to disk every time a new article is removed, by making the edits in green:
local function removeArticle(article)
  ReadLater.articles = hs.fnutils.filter(ReadLater.articles, function(savedArticle)
    return savedArticle.url ~= article.url
  end)

  updateMenu()
  writeArticlesToDisk()
end
Read from disk on startup #
Now that you’re correctly writing to disk, the last step is to read from disk on every startup, so you can pick back up every time with the latest version of articles. Add this line at the very bottom of the config file:
updateMenu()
readArticlesFromDisk()
Give it a test:
- Add some articles to your list.
- Quit Hammerspoon and reopen it.
The articles should still be there when you reload!
Optional: Watch the JSON file for external changes and reload #
If you’re using Dropbox sync, and you want your computer to automatically reload the JSON file when another computer writes to it, you can create a new file watcher to watch for changes to the JSON file. This will keep your computers in sync no matter what!
Add the snippet in green to the bottom of your config:
updateMenu()
readArticlesFromDisk()

jsonWatcher = hs.pathwatcher.new(ReadLater.jsonSyncPath, function(paths, flags)
  if hs.fnutils.contains(paths, ReadLater.jsonSyncPath) then
    readArticlesFromDisk()
  end
end)

jsonWatcher:start()
If you have two computers running this Hammerspoon code, try it out by adding an article on one computer. You should see it show up on the second one!