Floating hint menu for your keybindings
Show a beautiful floating popup box with all your keybinds when you hold down your modifier keys.
Next Chapter| APIs used today | Description |
| hs.application | Query and interact with running applications. |
| hs.canvas | This lets you draw anything you want to the screen. |
| hs.eventtap | Lets you listen for keypresses and respond to them. |
| hs.fnutils | A collection of functional programming utility functions. |
| hs.hotkey | Everything you need to bind functions to hotkeys. |
| hs.screen | APIs for querying and interacting with your displays. |
| hs.styledtext | Lets you style your text before drawing it with hs.canvas. |
What you’re building #
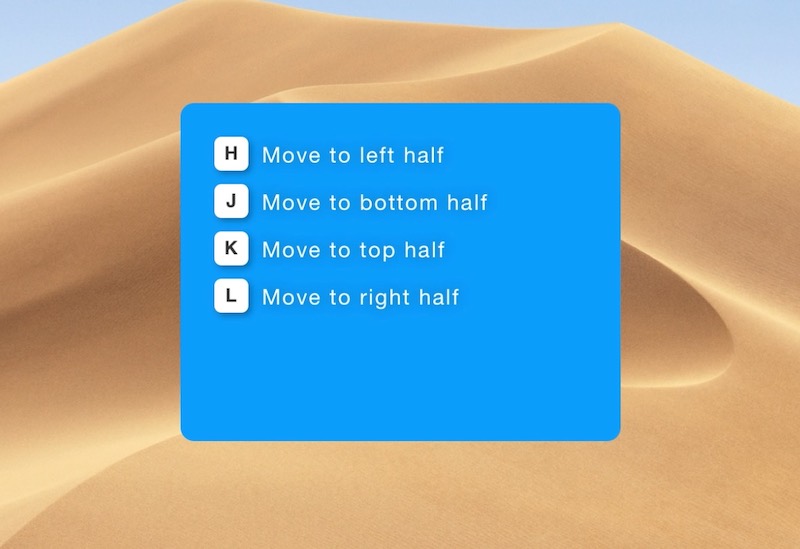
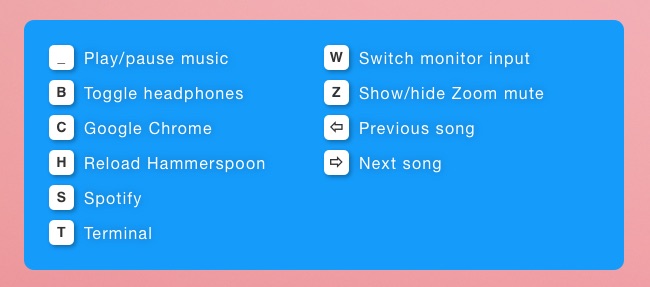
In this chapter, you’re going to build a Spacemacs-inspired floating hint menu that shows you all your fancy keybinds when you hold down Super or Hyper. Here’s what it looks like on my computer when I hold each of those keys down:
Once you’re done with this project, you’ll end up replacing all your hs.hotkey.bind keybindings with the new library you’ll create. That will look like this:

local WhichKey = require('which-key')

superKey = WhichKey:new(super)
hyperKey = WhichKey:new(hyper)

-- All your cool window resizing hotkeys from Chapter 11:
local wm = require('window-management')

superKey:bind('h').toFunction('Move to left half', wm.leftHalf)
superKey:bind('j').toFunction('Move to bottom half', wm.bottomHalf)
superKey:bind('k').toFunction('Move to top half', wm.topHalf)
superKey:bind('l').toFunction('Move to right half', wm.rightHalf)

-- Switch to running app, or launch it if it's not open
hyperKey:bind('c'):toApplication('Google Chrome')
hyperKey:bind('s'):toApplication('Slack')
hyperKey:bind('t'):toApplication('Terminal')

-- Bind arbitrary functions
hyperKey:bind('h'):toFunction("Hello world", function()
  hs.alert.show("Hello world!")
end)
With the example above, if you held down the Super key, you’d see a hint menu like this:
Inspiration #
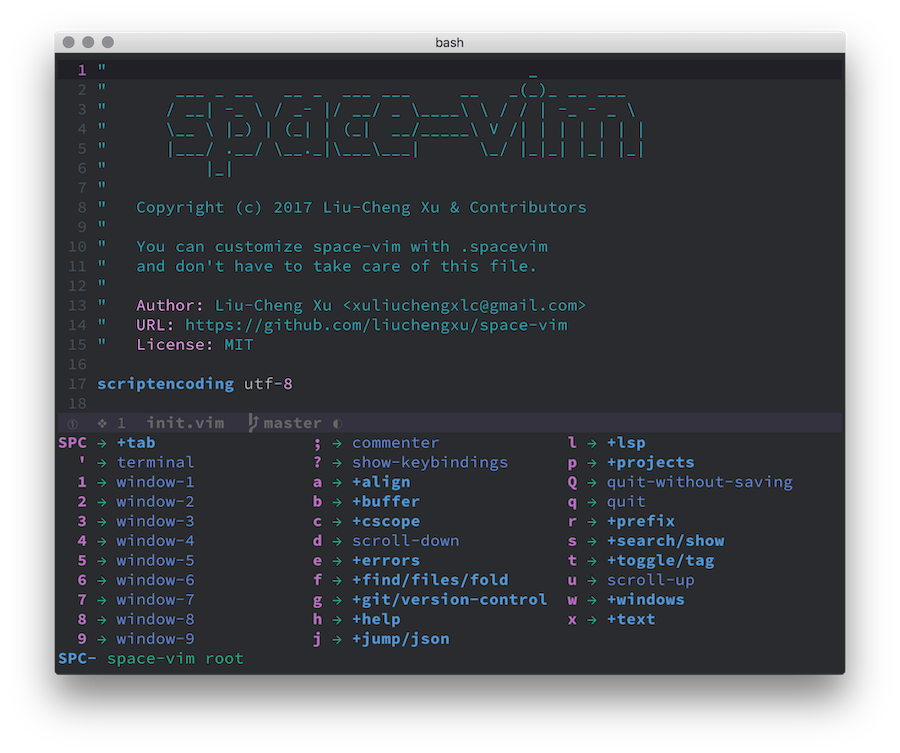
This project is heavily inspired by the emacs-which-key library (and the Neovim port), which shows you a list of available keybindings as hints as you type:
Your TODO List #
This is a bigger project, so you’re going to split it up into chunks. Here’s the basic todo list, which you’ll knock out in order:
- Create a new directory structure for the project
- Prototype the UI
- Draw the blue floating box
- Add functions to show/hide it
- Render each of the keybindings inside the floating box
- Show/hide the UI when your modifier keys are held
- Keep track of the desired modifier keys
- Detect when the modifier keys are held
- When they’re held down, show the UI you prototyped in step 2
- Create a keybinding interface
- Pass the real keybindings to your UI overlay
- Add the
:bind('key'):toFunction(...)interface from above - Add the
:bind('key'):toApplication(...)interface from above - Expose this interface from your library
- Wire up all your hot keys
- Setup hint menus for your super and hyper keys
- Find each of your keybindings, and replace them with
bind('key'):toFunction(...)or:toApplication(...)bindings.
Phew, that’s a lot. Let’s get started!
Create a new directory and file #
Because this is a larger project, you’re going to organize this code into multiple files. Create a directory and an initial init.lua file:
mkdir -p ~/.hammerspoon/which-key
touch ~/.hammerspoon/which-key/init.luaRequire the init.lua entry point in your top-level init.lua config file:
require("which-key") -- this requires "which-key/init.lua" for youPrototype the floating UI #
The first thing to do is prototype our UI, and get it to draw using some dummy data. In later sections, we’ll replace that dummy data with the real stuff, but for now it’s quickest for prototyping our UI to just draw every time.
In the next steps, you’ll set up your canvas, draw the blue container box, and then fill in all the hotkey hints afterwards.
Create an file for drawing the overlay UI #
Create a new file to hold your UI code:
touch ~/.hammerspoon/which-key/build-canvas.luaThen require it:
require('which-key.build-canvas')Create a new canvas #
Inside your new file, define a new buildCanvas function. This function will take care of creating a new hs.canvas object and drawing all of the overlay’s UI inside of it.
Add this starter code:
local function buildCanvas()
  -- For now, hardcode the width and height. Later in this chapter you'll
  -- dynamically size the box based on how many hotkeys we need to show.
  local canvasWidth = 400
  local canvasHeight = 300

  local canvas = hs.canvas.new{
    w = canvasWidth,
    h = canvasHeight,
    x = 100,
    y = 100,
  }

  -- Make sure it sits above all the windows
  canvas:level("overlay")

  return canvas
end

-- We'll delete this test code later, but for now this will just draw the canvas
-- every time you reload Hammerspoon, for fast prototyping.
prototypeCanvas = buildCanvas()
prototypeCanvas:show(0.15) -- fade it in 150ms

return buildCanvas
If you reload your Hammerspoon config, you won’t see anything new on the screen. That’s because hs.canvas just defines a rectangle and a position. Until you draw actual layers inside the canvas, it’s just a transparent box. Let’s draw something inside!
Render a blue floating box #
The first UI element you’ll render is the blue container box. However, before you do that, we need to add a quick helper function to define our box and text colors.
Add an rgba() helper #
I prefer to express colors in RGBA like (255, 255, 255), but hs.canvas and other Hammerspoon APIs expect the following shape:
local redColor = {
  red = 1.0,
  green = 0.0,
  blue = 0.0,
  alpha = 1.0,
}
Let’s make a helper function that translates (255, 255, 255) style RGB colors into what Hammerspoon expects to receive. Add this function at the very top of the file, above your buildCanvas definition:
-- Helper function to convert RGBA values to floating point numbers
-- that hs.canvas can use.
local function rgba(r, g, b, a)
  a = a or 1.0

  return {
    red = r / 255,
    green = g / 255,
    blue = b / 255,
    alpha = a
  }
end
Now you can define that same red color as redColor = rgba(255, 0, 0). Much better!
Draw the container #
To draw the blue container, you’ll use the canvas:insertElement function. The first argument to this function is a table describing the element you want to draw. At a bare minimum, it needs the type of canvas element you want to draw (circle, rectangle, text, etc). In addition to the type, there are dozens more parameters you can specify here.
Here’s an example of drawing the text “Hello world” onto a canvas:
myCanvas = hs.canvas.new({ x = 0, y = 0, w = 400, h = 300 })

myCanvas:insertElement({
  type = 'text',
  text = 'Hello world'
})Now it’s time to draw the container. You’ll give the box the following properties:
- It will be a rectangle
type. - It will be positioned in the top-left corner of the box at
(0, 0). - It will take up the full width and height of the canvas (
width = 100%, height = 100%). - It will have a rounded border radius of
10px. - It will have a background color in RGB of
(24, 135, 250), and alpha opacity of 100% (1.0).
Update your buildCanvas() function with a call to canvas:insertElement():
local function buildCanvas()
  -- For now, hardcode the width and height. Later in this chapter you'll
  -- dynamically size the box based on how many hotkeys we need to show.
  local canvasWidth = 400
  local canvasHeight = 300

  local canvas = hs.canvas.new{
    w = canvasWidth,
    h = canvasHeight,
    x = 100,
    y = 100,
  }

  -- Make sure it sits above all the windows
  canvas:level("overlay")

  -- render the blue background
  canvas:insertElement(
    {
      type = 'rectangle',
      action = 'fill',
      roundedRectRadii = { xRadius = 10, yRadius = 10 },
      fillColor = rgba(24, 135, 250, 1),
      frame = { x = 0, y = 0, h = "100%", w = "100%", },
    }
  )

  return canvas
end
Reload Hammerspoon and you should see a blue box in the upper left corner of the screen:
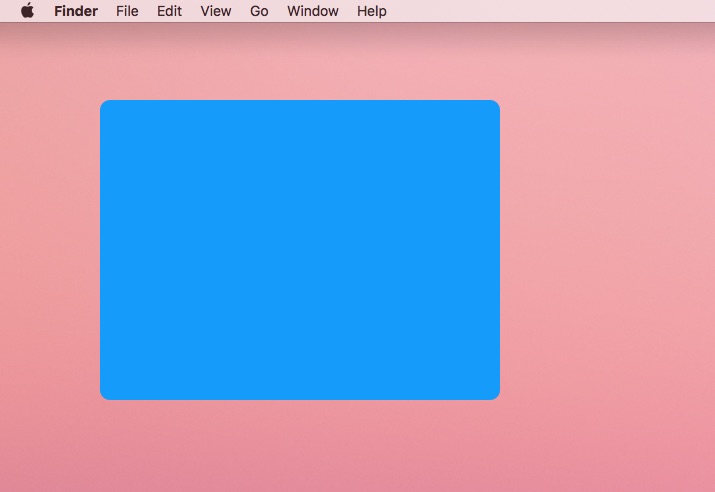
Next, let’s center it in the screen.
Center the overlay #
To center a canvas, you have to set the x coordinate equal to half the screen’s width minus half the canvas’ width. The y coordinate is similar–this needs to be set to half the screen’s height minus half the canvas’ height.
Set the topLeft position of the canvas by adding the code in green:
local function buildCanvas()
  -- For now, hardcode the width and height. Later in this chapter you'll
  -- dynamically size the box based on how many hotkeys we need to show.
  local canvasWidth = 400
  local canvasHeight = 300

  local canvas = hs.canvas.new{
    w = canvasWidth,
    h = canvasHeight,
    x = 100,
    y = 100,
  }

  -- Position the canvas in the very center of the screen.
  local frame = hs.screen.mainScreen():frame()

  canvas:topLeft({
    x = (frame.w / 2) - (canvasWidth / 2),
    y = (frame.h / 2) - (canvasHeight / 2),
  })

  --
  -- ... the rest of your code, insertElement, etc
  --

  return canvas
end
Reload Hammerspoon, and you should now see the overlay centered on your display.
Render some fake key bindings #
Next, you’re going to make some fake keybindings and draw them in your canvas.
Update the function signature #
First, change your function signature to take in a single parameter called bindings:
local function buildCanvas(bindings)
  -- ... the rest of your code
end
Pass in some test bindings #
Next, at the bottom of your file where you defined prototypeCanvas, create some fake keybindings to draw on the screen by removing the code in red and adding the code in green:
-- We'll delete this test code later, but for now this will just draw the canvas
-- every time you reload Hammerspoon, for fast prototyping.

local fakeBindings = {
  { key = "b", binding = { name = "Toggle headphones" } },
  { key = "c", binding = { name = "Google Chrome" } },
  { key = "h", binding = { name = "Reload Hammerspoon" } },
  { key = "s", binding = { name = "Spotify" } },
  { key = "t", binding = { name = "Terminal" } },
  { key = "w", binding = { name = "Switch monitor input" } },
  { key = "z", binding = { name = "Show/hide Zoom mute" } },
  { key = "_", binding = { name = "Play/pause music" } }, -- spacebar
  { key = "⇦", binding = { name = "Previous song" } }, -- left arrow
  { key = "⇨", binding = { name = "Next song" } }, -- right arrow
}

prototypeCanvas = buildCanvas(fakeBindings)
prototypeCanvas = buildCanvas()
prototypeCanvas:show(0.15) -- fade it in 150ms
Loop through the bindings and render each one #
Take a minute to recall the UI that you’re building:
- We want some padding inside the blue box.
- We want to render the key code inside of a square white box.
- We want to render the description of what that key does next to it.
- We only want to render 6 hints per column.
The most math-y piece of this is computing the correct position for each hint, so they display in nicely aligned rows and have a max of 6 hints per column.
Modify your buildCanvas() function, deleting the red lines and adding the green ones:
local function buildCanvas(bindings)
  -- For now, hardcode the width and height. Later in this chapter you'll
  -- dynamically size the box based on how many hotkeys we need to show.
  local canvasWidth = 400
  local canvasHeight = 300
  -- How much padding should there be around the edges of the container so it
  -- looks nice?
  local containerPadding = 25

  -- How many hints should we have per column?
  local itemsPerColumn = 6

  -- How tall is each hi;nt?
  local itemHeight = 25

  -- How much margin should we have between hints within a column?
  local itemBottomMargin = 10

  -- The total height of the container = height + bottom margin.
  local itemContainerHeight = itemHeight + itemBottomMargin

  -- How wide each column should be
  local columnWidth = 275

  -- How many total columns do we have?
  --
  --   Example: if there's 25 key bindings and 6 items per column, we'd have:
  --
  --     25 / 6 = 4.166666667 columns
  --
  --   which we'd ceil() round up to 5.
  local columnCount = math.ceil(#bindings / itemsPerColumn)

  -- The full width of the canvas is calculated by adding together:
  --
  --   * The left and right padding (`containerPadding * 2`)
  --   * Enough width for the number of columns we have (`columnCount * columnWidth`)
  --
  local canvasWidth = (containerPadding * 2) + (columnCount * columnWidth)

  -- The full height of the canvas is calculated by adding together:
  --
  --  * The top and bottom padding (`containerPadding * 2`)
  --  * Enough height to contain a single column's hints (`itemsPerColumn * itemContainerHeight`)
  --
  -- Because the final item in the column will add some extra margin, we subtract
  -- `itemBottomMargin` from the total so the top and bottom appear balanced.
  local canvasHeight = (containerPadding * 2) + (itemsPerColumn * itemContainerHeight) - itemBottomMargin

  local canvas = hs.canvas.new{
    w = canvasWidth,
    h = canvasHeight,
    x = 100,
    y = 100,
  }

  -- Position the canvas in the very center of the screen.
  local frame = hs.screen.mainScreen():frame()

  canvas:topLeft({
    x = (frame.w / 2) - (canvasWidth / 2),
    y = (frame.h / 2) - (canvasHeight / 2),
  })

  -- Make sure it sits above all the windows
  canvas:level("overlay")

  --
  -- ... the rest of your code, insertElement, etc
  --

  return canvas
end
Phew, that was a lot of code. Reload Hammerspoon, and the overlay should now be larger than it was. Because we passed in 10 fakeBindings above, the overlay will be 10 / 6 = 2 columns wide (plus padding).
We’re almost done with the UI portion, which is probably the biggest chunk of code. Now the container is the right size, you’re ready to loop through all the bindings and rendering each one in the right position.
Add the code in green to your buildCanvas() function:
local function buildCanvas(bindings)
--
-- the beginning of this function - hs.canvas.new, etc
--
-- render the blue background
canvas:insertElement(
{
type = 'rectangle',
action = 'fill',
roundedRectRadii = { xRadius = 10, yRadius = 10 },
fillColor = rgba(24, 135, 250, 1),
frame = { x = 0, y = 0, h = "100%", w = "100%", },
}
)
-- Sort the keybindings by key code, from A-Z
table.sort(bindings, function(a, b)
return a.key < b.key
end)
-- Loop through each keybinding hint and draw it in the canvas:
for index, entry in pairs(bindings) do
-- How big should the square key "icon" be? 25x25px
local keySize = 25
-- How much margin should there be between the key icon and the description
-- text?
local keyRightMargin = 10
-- Lua's tables are 1-indexed, but the math is going to be wayyy easier if
-- we convert to 0-indexed before computing the `(x, y)` coordinate of this
-- hint.
local zeroIndex = index - 1
-- Figure out which # column this hint belongs in. Starts at 0.
local columnIndex = math.floor(zeroIndex / itemsPerColumn)
-- Figure out which row this hint belongs in. Starts at 0.
local rowIndex = zeroIndex % itemsPerColumn
-- Find the upper left starting coordinate of each hint `(x, y)`:
-- Starting from 0, we get the `x` coordinate by moving to the right by
-- `containerPadding`, then moving right however many column widths we need:
local startX = containerPadding + (columnIndex * columnWidth)
-- Starting from 0, we get the `y` coordinate by moving down by
-- `containerPadding`, then moving down by however many `itemContainerHeight`
local startY = containerPadding + (rowIndex * itemContainerHeight)
-- Draw a 25x25 square keycap "icon"
canvas:insertElement(
{
type = 'rectangle',
action = 'fill',
roundedRectRadii = { xRadius = 5, yRadius = 5 },
fillColor = rgba(255, 255, 255, 1.0),
frame = {
x = startX,
y = startY,
w = keySize,
h = keySize,
},
-- Add a nice drop shadow to it.
withShadow = true,
shadow = {
blurRadius = 5.0,
color = { alpha = 1/3 },
offset = { h = -2.0, w = 2.0 },
}
}
)
-- Write the keycode (e.g. "Z") inside of the 25x25 keycap icon.
canvas:insertElement(
{
type = 'text',
-- Uppercase keys look nicer.
text = string.upper(entry.key),
action = 'fill',
frame = {
x = startX,
y = startY + 3,
h = keySize,
w = keySize,
},
-- Center the text in the keycap
textAlignment = "center",
textColor = rgba(38, 38, 38, 1.0),
textFont = "Helvetica Bold",
textSize = 14,
}
)
-- Write the description (e.g. "Mute Zoom") to the right of the keycap
canvas:insertElement(
{
type = 'text',
text = hs.styledtext.new(
entry.binding.name,
{
font = { name = "Helvetica Neue", size = 16 },
color = rgba(255, 255, 255, 1.0),
kerning = 1.2,
shadow = {
blurRadius = 10,
}
}
),
action = 'fill',
frame = {
-- Make sure there's margin between the keycap at the text so it
-- doesn't look cramped.
x = startX + keySize + keyRightMargin,
y = startY,
h = keySize,
w = 300,
},
}
)
end
return canvas
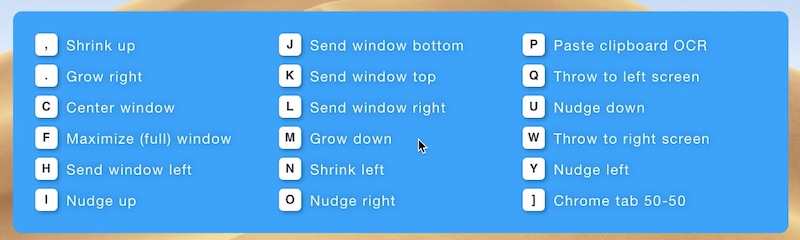
endReload Hammerspoon, and you should see the hints correctly positioned:
Now that everything is being perfectly drawn, the last step is to remove the prototypeCanvas code, as it’s probably been annoying you by always drawing the overlay in the center of the screen. Remove the lines in red:
local function buildCanvas()
  --
  -- all your code in here...
  --
end

-- We'll delete this test code later, but for now this will just draw the canvas
-- every time you reload Hammerspoon, for fast prototyping.

local fakeBindings = {
  { key = "b", binding = { name = "Toggle headphones" } },
  { key = "c", binding = { name = "Google Chrome" } },
  { key = "h", binding = { name = "Reload Hammerspoon" } },
  { key = "s", binding = { name = "Spotify" } },
  { key = "t", binding = { name = "Terminal" } },
  { key = "w", binding = { name = "Switch monitor input" } },
  { key = "z", binding = { name = "Show/hide Zoom mute" } },
  { key = "_", binding = { name = "Play/pause music" } }, -- spacebar
  { key = "⇦", binding = { name = "Previous song" } }, -- left arrow
  { key = "⇨", binding = { name = "Next song" } }, -- right arrow
}

prototypeCanvas = buildCanvas(fakeBindings)
prototypeCanvas:show(0.15) -- fade it in 150ms

return buildCanvas
🎉 You’re done creating your UI! Time to make yourself a coffee. Next, you’ll move onto showing it when your super or hyper keys are held down.
Show/hide the floating UI when modifier keys are held #
Now that your UI works, the next step is to show and hide the overlay whenever your modifier keys get held down.
Wrap buildCanvas() in an object you can show/hide #
To make this a little easier, let’s make a tiny object that wraps your canvas with some show/hide functions.
Create a new overlay.lua file:
touch ~/.hammerspoon/which-key/overlay.luaInside the file, paste this code:
local buildCanvas = require('which-key.build-canvas')

local Overlay = {}

-- Takes in a table of key bindings so we can pass them along to
-- buildCanvas() later.
function Overlay:new(bindings)
  local overlay = {
    bindings = bindings or {},
    canvas = nil,
  }

  setmetatable(overlay, self)
  self.__index = self

  return overlay
end

function Overlay:show()
  self.canvas = buildCanvas(self.bindings)
  self.canvas:show(0.15) -- fade in for 150ms
end

function Overlay:hide()
  self.canvas:delete(0.15) -- fade out for 150ms
  self.canvas = nil
end

return Overlay
The constructor of this object takes in a table of bindings, just like buildCanvas() did in the previous step. When the :show() method is called, it builds a new canvas and fades it in over 150ms. When the :hide() method is called, it fades the canvas out over 150ms, and then destroys the object.
Create an onModifierHold utility #
Now that you have the Overlay object made, you need a way to show it and hide it when the Super or Hyper keys are held down. You’re going to make a utility function called onModifierHold which creates an hs.eventtap to detect when modifiers are held down, and fires a function both on hold and on release.
onModifierHold will take 4 arguments:
| Argument | Description |
|---|---|
modifiers |
The exact modifier keys to listen for, e.g. {'cmd', 'shift'}. |
timeoutMs |
How long to wait before firing onHold() in milliseconds, e.g. 250. |
onHold |
A function to fire when modifiers are held down longer than timeoutMs. |
onRelease |
A function to fire when modifiers are released after being held. |
Create a new file to hold the function:
touch ~/.hammerspoon/which-key/on-modifier-hold.luaHere’s how you’ll make this function work:
- If you detect the
modifiersare held, schedule a timer to firetimeoutMsfrom now. - If the user releases the keys before
timeoutMsg, cancel the timer. - Once the timer has waited
timeoutMs, fireonHold(). - Finally, once you detect any of the
modifiersbeing released, fireonRelease(). - Done!
Here’s an implementation of that scheme, which you’ll paste into on-modifier-hold.lua:
local function onModifierHold(modifiers, timeoutMs, onHold, onRelease)
  local state = {
    held = false,
    holdTimer = nil,
    onHold = onHold,
    onRelease = onRelease,
    tap = nil,
  }

  local cancelTimer = function()
    if not state.holdTimer then return end

    state.holdTimer:stop()
    state.holdTimer = nil
  end

  -- This event fires whenever the modifier keys changed.
  -- In eventtap's world, modifiers are called "flags", because each
  -- key (cmd, alt, etc) gets a flag bit set to 0 or 1 depending if
  -- it is held or not.
  state.tap = hs.eventtap.new(
    { hs.eventtap.event.types.flagsChanged },
    -- Whenever the modifier keys change, this function will be fired
    -- by the event tap.
    function(event)
      local containsFlags = event:getFlags():containExactly(modifiers)

      if state.held then
        -- The `modifiers` are currently being held, so we're just waiting for
        -- the user to release them.
        --
        -- If the modifiers are not held any more, then we want to set `held`
        -- to `false` and fire `onRelease()`.
        if not containsFlags then
          state.held = false
          onRelease()
          cancelTimer()
        end
      elseif state.holdTimer then
        -- We are waiting for the timeout timer to fire, so we're somewhere
        -- between 0ms and `timeoutMs`.
        if not containsFlags then
          -- If the modifiers aren't held down anymore, we can go ahead and
          -- cancel our timer.
          cancelTimer()
        end
      elseif containsFlags then
        -- If you're in this block, the user *just* held down the modifier keys.
        -- However, the clock is at 0ms at this point.
        --
        -- We need to wait for `timeoutMs` before actually firing `onHold()`.
        --
        -- To achieve this, we can schedule a timer to fire a
        -- callback in `timeoutMs`. Once that time is hit, we'll flip `held`
        -- to `true` and fire `onHold()`.
        state.holdTimer = hs.timer.doAfter(timeoutMs / 1000, function()
          state.held = true
          onHold()
        end)
      end

      -- By returning `false` in this tap, you're making sure that key presses
      -- are still allowed to pass through to programs.
      --
      -- If you *don't* return true the keyboard will just stop working haha...
      return false
    end
  )

  -- You need to start the event tap or it won't work :)
  state.tap:start()

  return state.tap
end

return onModifierHold
Read through the code and follow the comments to get a sense of how it works. Next, we’ll actually wire this function up to the buildCanvas() function you created in the first section of this chapter.
Create your main object #
Now that you have the Overlay object and onModifierHold() function ready to use, it’s time to create the main object of your library. This will be the object interface you end up publicly exposing from your which-key/init.lua file, so that you can use it across your Hammerspoon configs to bind your keys.
Open up init.lua and replace the contents of the file with this:
local onModifierHold = require('which-key.on-modifier-hold')
local Overlay = require('which-key.overlay')

------------------------------------------

local WhichKey = {}

function WhichKey:new(modifiers)
  local instance = {}

  setmetatable(instance, self)
  self.__index = self

  instance.modifiers = modifiers

  -- For now, we'll fake the keybindings to make sure this is working correctly.
  instance.keyBindings = {
    { key = "b", binding = { name = "Toggle headphones" } },
    { key = "c", binding = { name = "Google Chrome" } },
    { key = "h", binding = { name = "Reload Hammerspoon" } },
    { key = "s", binding = { name = "Spotify" } },
    { key = "t", binding = { name = "Terminal" } },
    { key = "w", binding = { name = "Switch monitor input" } },
  }

  instance.overlay = Overlay:new(instance.keyBindings)

  local overlayTimeoutMs = 250 -- wait 250ms before showing overlay

  -- Show our Overlay on hold
  local onHold = function()
    instance.overlay:show()
  end

  -- Hide it on release
  local onRelease = function()
    instance.overlay:hide()
  end

  -- Create and start the "modifiers held" listener
  instance.holdTap = onModifierHold(
    modifiers,
    overlayTimeoutMs,
    onHold,
    onRelease
  )

  return instance
end

return WhichKey
Test it out #
Let’s test out this new WhichKey object real fast. Open up your main init.lua config and paste this in anywhere:
local WhichKey = require('which-key')

hyperKey = WhichKey:new(hyper)
Reload Hammerspoon and try holding down your Hyper key. You should see the overlay show up with the 6 fake keybindings you set up. It’ll look something like this:
🎉 You’re done connecting the UI to your keyboard! The final big step is to expose an interface for actually binding keys.
Create a way to bind keys #
Remove the fake key bindings #
First, remove the fake key bindings from your WhichKey constructor by deleting the lines in red and adding the lines in green:
function WhichKey:new(modifiers)
local instance = {}
setmetatable(instance, self)
self.__index = self
instance.modifiers = modifiers
-- For now, we'll fake the keybindings to make sure this is working correctly.
instance.keyBindings = {
{ key = "b", binding = { name = "Toggle headphones" } },
{ key = "c", binding = { name = "Google Chrome" } },
{ key = "h", binding = { name = "Reload Hammerspoon" } },
{ key = "s", binding = { name = "Spotify" } },
{ key = "t", binding = { name = "Terminal" } },
{ key = "w", binding = { name = "Switch monitor input" } },
}
Expose an interface to create keybinds #
You’re going to create two styles of key binding. One will launch or focus an application when pressed. The other will fire any function you pass it when pressed.
Here’s what it will look like:
hyperKey = WhichKey:new(hyper)

-- Binds hyper + t to a function
hyperKey:bind('t'):toFunction("Say hello", function()
  hs.alert.show("Hello there!")
end)

-- Binds hyper + c to quick switch to Google Chrome
hyperKey:bind('c'):toApplication('/Applications/Google Chrome.app')
Create some Binding types #
To help with this interface, let’s create a couple objects to represent each kind of binding. You’ll make FunctionBinding to power the toFunction() style of keybind. Correspondingly, you’ll also make a ApplicationBinding object to power the toApplication() style of keybind.
Each binding will have the following fields and methods:
| Field | Description |
|---|---|
binding.name |
The description that gets printed on the overlay, e.g. "Say hello". |
binding:launch() |
The function we want to fire when this keybinding is pressed. |
After you make these helper objects, you’ll finish up by adding the :bind(key) interface to WhichKey.
Create a new bindings.lua file:
touch ~/.hammerspoon/which-key/bindings.luaFunctionBinding #
The first object wraps the keybinding name and a function fn that we want to call when the key is pressed. Paste this code into bindings.lua:
local FunctionBinding = {}

function FunctionBinding:new(name, fn)
  local functionBinding = {
    name = name,
    fn = fn,
  }

  setmetatable(functionBinding, self)
  self.__index = self

  return functionBinding
end

function FunctionBinding:launch()
  self.fn()
end
ApplicationBinding #
The second object takes in an applicationPath like /Applications/Google Chrome.app, sets its name to "Google Chrome", and launches or focuses the application when binding:launch() is called.
Paste this code below the FunctionBinding object you just made in bindings.lua:
local ApplicationBinding = {}

function ApplicationBinding:new(applicationPath)
  -- Convert an `applicationPath` like "/Applications/Google Chrome.app"
  -- into just its name: "Google Chrome"
  local parts = hs.fnutils.split(applicationPath, "/")
  local name = parts[#parts]

  local nameParts = hs.fnutils.split(name, ".", nil, true)
  local basename = nameParts[1]

  local applicationBinding = {
    name = basename,
    applicationPath = applicationPath,
  }

  setmetatable(applicationBinding, self)
  self.__index = self

  return applicationBinding
end

function ApplicationBinding:launch()
  hs.application.launchOrFocus(self.applicationPath)
end
Return the bindings #
At the very bottom of bindings.lua, make sure to return these objects you just made so we can use them in which-key/init.lua in the next step:
return {
  ApplicationBinding = ApplicationBinding,
  FunctionBinding = FunctionBinding,
}
Create the :bind() interface #
We’re almost done! The last bit of library code to write is to add the :bind(key):toFunction(...) and :bind(key):toApplication(...) interface to WhichKey.
Open up which-key/init.lua and add the lines of code in green to the file:
local onModifierHold = require('which-key.on-modifier-hold')
local Overlay = require('which-key.overlay')
local bindings = require('which-key.bindings')

------------------------------------------

local WhichKey = {}

function WhichKey:new(modifiers)
  local instance = {}

  setmetatable(instance, self)
  self.__index = self

  instance.modifiers = modifiers
  instance.keyBindings = {}
  instance.overlay = Overlay:new(self.keyBindings)

  local overlayTimeoutMs = 250 -- wait 250ms before showing overlay

  local onHold = function()
    instance.overlay:show()
  end

  local onRelease = function()
    instance.overlay:hide()
  end

  instance.holdTap = onModifierHold(
    modifiers,
    overlayTimeoutMs,
    onHold,
    onRelease
  )

  return instance
end

-- :bind() either takes in a single key to bind,
-- or a pair of keys corresponding to the key you want to display on the
-- popup overlay (`displayedKey`) and the key you want to bind your function to
-- (`bindKey`)
function WhichKey:bind(displayedKey, bindKey)
  bindKey = bindKey or displayedKey

  -- We just return an object here with `toApplication` and
  -- `toFunction`, so we can chain our API like:
  --
  --   hyperKey:bind('t'):toApplication('/Applications/Utilities/Terminal.app')
  return {
    toApplication = function(_, applicationName)
      return self:_bind(
        displayedKey,
        bindKey,
        bindings.ApplicationBinding:new(applicationName)
      )
    end,
    toFunction = function(_, name, fn)
      return self:_bind(
        displayedKey,
        bindKey,
        bindings.FunctionBinding:new(name, fn)
      )
    end
  }
end

function WhichKey:_bind(key, bindKey, binding)
  -- Save the key binding in our table, so the overlay knows to draw it
  -- on the screen
  table.insert(self.keyBindings, {
    key = key,
    bindKey = bindKey,
    binding = binding
  })

  -- Bind the actual hotkey to the binding's `launch()` function, as defined
  -- in `bindings.lua`.
  hs.hotkey.bind(self.modifiers, bindKey, function()
    binding:launch()
  end)

  return self
end

return WhichKey
🎉 You’re done with the final bit of library code! Time for more coffee? The very last thing to do is start using this library, by wiring up your hot keys.
Wire up your existing hot keys #
The final step is to go through your configs and replace all your hs.hotkey.bind() calls with calls to your new WhichKey library.
Require WhichKey in init.lua #
Remember when you added the super and hyper key to your config way back in chapter 3? Let’s extend those keys with our new powerful WhichKey library. Add the lines of code in green to your init.lua file:
-- Make sure these variables are always at the _top_ of your init.lua file,
-- before you require() any extra files. Otherwise you might end up with other
-- config files trying to reference them before they are set.
super = {'cmd', 'ctrl', 'alt'}
hyper = {'cmd', 'ctrl', 'alt', 'shift'}

local WhichKey = require('which-key')
superKey = WhichKey:new(super)
hyperKey = WhichKey:new(hyper)
Change your keybinds to use WhichKey-style bindings #
Do a project-wide search in your ~/.hammerspoon folder for hs.hotkey.bind. You can use your editor’s built in search, or the command line:
cd ~/.hammerspoon
grep -r "hs.hotkey.bind" .
For each result you find that binds to super or hyper, replace it with your WhichKey-style binding.
As an example, I might change the lines of code in red to the code in green:
-- What an outdated key bind
hs.hotkey.bind(hyper, 'h', function()
  hs.alert.show("Hello!")
end)
hyperKey:bind('h'):toFunction('Hello world', function()
  hs.alert.show("Hello!")
end)
I also like to bind hotkeys to various applications on my system to quickly switch between them. Here’s some bindings I have set up:
hyperKey
  :bind('1'):toApplication('/Applications/1Password 7.app')
  :bind('a'):toApplication('/Applications/Slack.app')
  :bind('c'):toApplication('/Applications/Google Chrome.app')
  :bind('i'):toApplication('/Applications/Signal.app')
  :bind('l'):toApplication('/Users/dbalatero/Applications/Chrome Apps.localized/Google Calendar.app')
  :bind('s'):toApplication('/Applications/Spotify.app')
  :bind('t'):toApplication('/Applications/Alacritty.app')
You might like to have something similar!